Replacing a dryer drum seal may not be at the top of every homeowner’s maintenance checklist, yet it is one of the most crucial components in keeping your dryer running efficiently. A worn or damaged drum seal can lead to excessive heat loss, poor drying performance, and even increased energy consumption. Understanding the role of the dryer drum seal, identifying when it needs replacement, and performing the replacement correctly can save both money and time while extending the lifespan of your dryer.
Understanding the Dryer Drum Seal
The dryer drum seal, often overlooked, is a simple yet essential component that forms a tight barrier between the rotating drum and the dryer’s bulkhead or front panel. This seal ensures that the heat generated inside the dryer remains inside the drum, allowing your clothes to dry evenly and efficiently. Without a proper seal, hot air escapes, moisture remains trapped, and the dryer struggles to perform effectively.
Drum seals are typically made from felt, rubber, or a combination of materials designed to withstand high temperatures and constant friction. The seal’s positioning around the edges of the drum ensures that it rubs lightly against the bulkhead, creating an airtight enclosure while still allowing the drum to rotate freely. Over time, however, heat, friction, and wear can degrade the seal, leading to gaps, fraying, and other issues that compromise dryer performance.
Signs That a Dryer Drum Seal Needs Replacement
Many homeowners do not realize a drum seal is failing until they experience persistent problems with their dryer. Some common symptoms include unusually long drying times, increased energy bills, and excessive heat or noise from the dryer. In some cases, a worn seal can cause clothes to come into direct contact with metal edges, leading to fabric damage.
Another telltale sign of a failing drum seal is visible wear. If you open the dryer and notice frayed edges, cracks, or hardened material around the seal, it is a clear indicator that replacement is necessary. Additionally, air leakage around the drum may cause lint accumulation in unusual areas, signaling that the seal is no longer providing an effective barrier. Paying attention to these signs can help prevent more extensive damage to the dryer over time.
Tools and Materials Needed for Replacement
Although replacing a dryer drum seal might seem intimidating, the process is straightforward with the right tools and materials. Typically, you will need a screwdriver, nut driver, or socket set to remove panels and access the drum. Depending on the dryer model, other specialized tools may be required, but most standard tools are sufficient. It is also essential to obtain the correct replacement seal for your dryer model. Using an incompatible seal may result in improper fitting and decreased performance.
Before beginning the replacement process, ensure that the dryer is unplugged and disconnected from any power source. Safety is paramount, and even a small electrical shock can cause serious injury. Preparing a clean workspace with adequate lighting and removing all clothing and lint from the dryer will make the replacement process smoother.
Step-by-Step Dryer Drum Seal Replacement
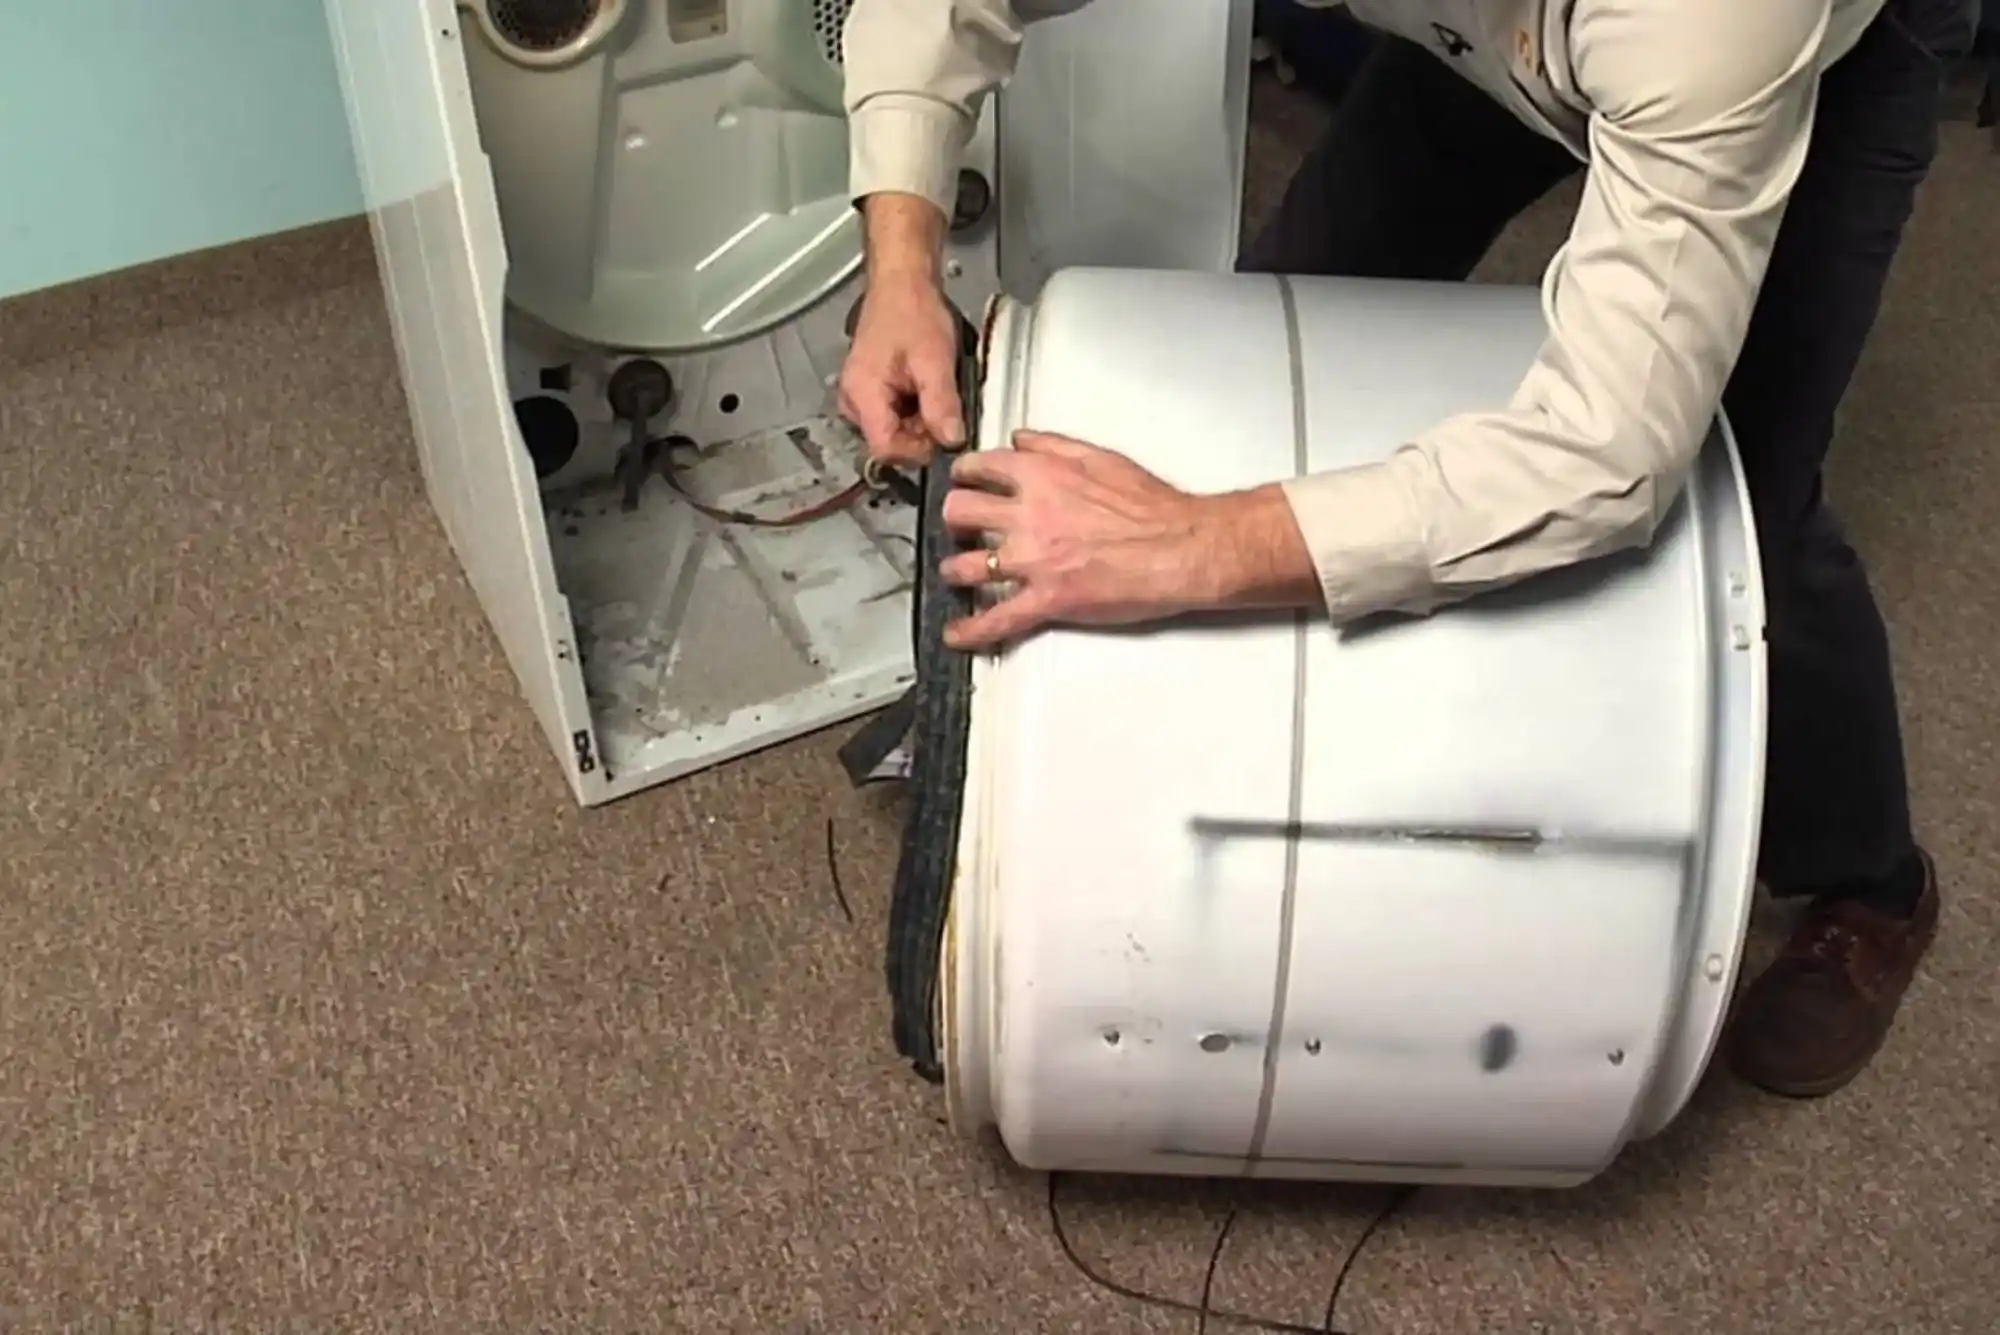
The first step in replacing a dryer drum seal involves removing the dryer drum itself. This typically requires detaching the front panel, which may involve removing screws, clips, or other fasteners depending on the dryer brand and model. Once the front panel is removed, you will have clear access to the drum and its seal.
Next, carefully remove the old drum seal. It is important to note how the seal was positioned, as the new seal must be installed in the same orientation to ensure proper function. Take your time removing any adhesive residue or lint buildup that may have accumulated around the seal. Clean the surrounding areas thoroughly before applying the new seal.
Installing the new drum seal requires patience and precision. Begin by aligning the seal with the drum edges and pressing it into place, ensuring that it sits evenly around the circumference. Some seals may have adhesive backing, while others may require screws or clips to secure them. Verify that the seal is snug against the drum and that no gaps are present, as even a small misalignment can compromise dryer efficiency.
Once the seal is in place, carefully reinstall the dryer drum and front panel, ensuring that all screws and fasteners are tightened securely. Reconnect any belts or rollers that were removed and double-check that the drum rotates freely without obstruction. Finally, reconnect the dryer to its power source and perform a test run to verify that the dryer is heating and rotating correctly.
Benefits of Replacing a Worn Dryer Drum Seal
Replacing a worn drum seal offers numerous benefits beyond simply restoring the dryer’s functionality. First and foremost, a new seal improves energy efficiency by preventing heat from escaping. This leads to shorter drying times and reduced electricity consumption. Additionally, a properly sealed drum ensures more even drying, reducing the risk of damp spots or unevenly dried clothing.
A new drum seal also minimizes wear on other dryer components. By keeping the drum properly aligned and reducing friction against the bulkhead, it helps prevent premature wear on bearings, rollers, and belts. This can save significant repair costs over the lifetime of the appliance. Furthermore, replacing a seal reduces noise and vibration, resulting in a quieter, smoother operation that is more pleasant in a home environment.
Maintenance Tips to Extend Drum Seal Life
To get the most out of your new drum seal, regular maintenance is key. Keep the dryer clean, removing lint and debris from both the drum and vent system. Over time, accumulated lint can increase friction on the seal, accelerating wear. Running the dryer on lower heat settings when possible can also reduce thermal stress on the seal, extending its lifespan.
Regular inspection is another critical maintenance practice. Periodically check the seal for signs of wear, cracking, or fraying. Early detection allows you to address issues before they escalate, preventing additional damage to the dryer. Keeping the dryer level and ensuring the drum rotates smoothly without obstruction also contributes to the seal’s longevity.
Common Mistakes to Avoid During Replacement
While dryer drum seal replacement is generally straightforward, there are common mistakes that can compromise the repair. One of the most frequent errors is improper alignment of the new seal. Even a minor misalignment can create gaps that reduce efficiency and increase wear. Another mistake is failing to clean the drum edges before installation, which can prevent the new seal from adhering correctly.
Using the wrong type of seal is another pitfall. It is essential to purchase a replacement that matches your dryer’s model and specifications. Using an incompatible seal can cause damage to the drum or bulkhead and may void manufacturer warranties. Finally, rushing the installation process can lead to improper fastening, gaps, or uneven pressure. Taking the time to follow each step carefully ensures a successful replacement.
Professional vs. DIY Replacement
For many homeowners, replacing a dryer drum seal is a manageable DIY task. However, those unfamiliar with appliance repair may prefer professional assistance. A certified appliance technician can ensure that the seal is installed correctly, the drum is aligned, and any additional issues are addressed. Professional replacement can provide peace of mind and guarantee optimal dryer performance.
DIY replacement offers cost savings and the satisfaction of completing a home repair project. With proper research, the right tools, and careful attention to detail, most homeowners can replace the drum seal themselves. Videos, manufacturer manuals, and online guides provide step-by-step instructions tailored to specific dryer models, making the process accessible to those willing to invest time and effort.
The dryer drum seal plays a crucial role in maintaining the efficiency, safety, and longevity of your appliance. Ignoring a worn or damaged seal can lead to increased energy bills, longer drying times, and unnecessary wear on other dryer components. By understanding its function, recognizing signs of wear, and performing replacement correctly, homeowners can ensure their dryer operates at peak performance for years to come.